Rule Execution App Service for Dynamics 365
This section is only required for customers who are self-hosting following the ARM Template Deployment Path.
Next, we will deploy the InRule Rule Execution App Service. To make this process easier, we'll be using an Azure Resource Manager (ARM) template, which allows us to deploy and configure all the Azure resources the Rule Execution Service relies on.
There are a number of methods for deploying an ARM template; this documentation will detail two: via Azure CLI and via PowerShell.
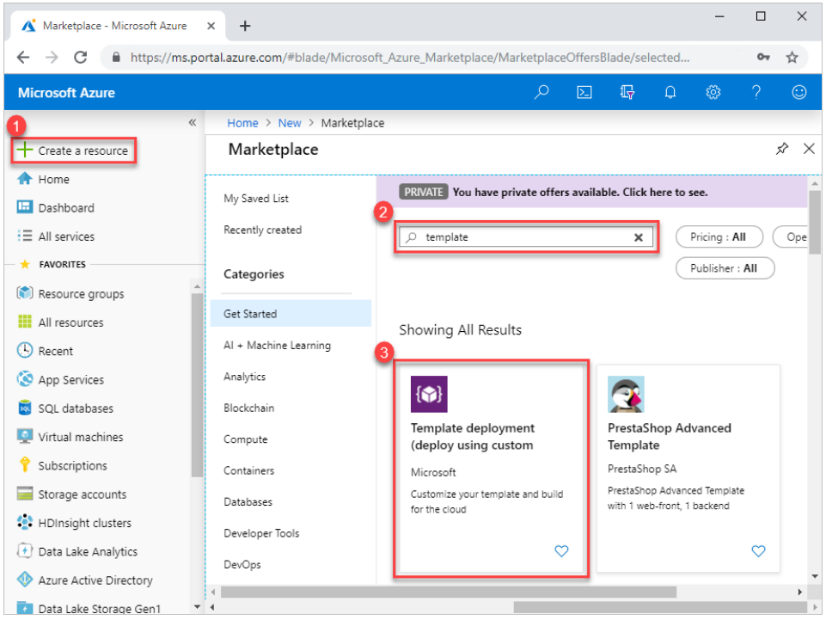
Alternatively, while this document does not provide a walkthrough of it, the ARM template provided is configured to work with Azure Portal deployment. For an overview of how to leverage ARM deployment through the Azure Portal, reference Microsoft's documentation: Deploy resources with ARM templates and Azure portal and navigate to the section titled "Deploy resources from custom template".
You can navigate directly to the Azure Portal page for deploying an ARM template at this link: Custom deployment - Microsoft Azure.
1: Registering an Azure Active Directory Application (Optional)
If you are self-hosting, you will need to provide a Dataverse connection string when deploying the Azure resources so that the Execution Service can communicate back to Dataverse. If you already have a known, working Dataverse connection string for connecting to the environment you're integrating with you may be able to use that, but if not, you will need to choose an authentication method and build a connection string for that. This may require creating an Azure Active Directory application to continue, review Dataverse Connectivity and Authorization for more information and steps on how to register an application.
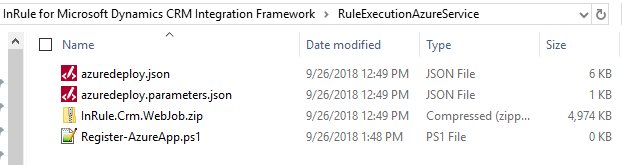
2: Locate azuredeploy.parameters.json
Before deploying the ARM template, we need to define certain parameters.
The required azuredeploy.json and azuredeploy.parameters.json files can be downloaded here - AzureAppServices/Dynamics at master · InRule/AzureAppServices · GitHub.
Alternatively, they can be located within the InRule for Microsoft Dynamics 365 Integration Framework.zip file downloaded in Optional Resource Files.
3: Update Parameters
Open the file with your text editor of choice and edit the parameters listed below. After deployment, these settings will then be viewable and modifiable as App Service Environment Variables in the Azure Portal.
{
    "$schema": "https://schema.management.azure.com/schemas/2015-01-01/deploymentParameters.json#",
    "contentVersion": "1.0.0.0",
    "parameters": {
        "appServiceName": {
            "value": ""
        },
        "primaryApiKey": {
            "value": ""
        },
        "secondaryApiKey": {
            "value": ""
        },
        "crmConnectionString": {
            "value": ""
        },
        "catalogUri": {
            "value": ""
        },
        "catalogUser": {
            "value": ""
        },
        "catalogPassword": {
            "value": ""
        },
        "ruleAppLabel": {
            "value": ""
        },
        "createOrUpdateAppServicePlan": {
            "value": true
        },
        "appServicePlanName": {
            "value": ""
        },
        "inruleVersion": {
            "value": ""
        },
        "appInsightsConnectionString": {
            "value": ""
        }
    }
}
| # | Parameter | Description |
|---|---|---|
| 1 | appServiceName | Provide a name for the Rule Execution Azure App Service. This name will be used for the name of the App Service as well as the prefix to the Azure URL, e.g., https://{appServiceName}.azurewebsites.net. See Deciding resource names for recommended naming conventions. |
| 3 | catalogUri | The URI for the Catalog Service that will be used Example: https://myapp-inrule-dev-catalog.azurewebsites.net/service.svc |
| 4 | catalogUser | Username for Catalog Service, default value is 'admin'. |
| 5 | catalogPassword | Password for Catalog Service, default is 'password', please change this using the catalog manager! |
| 6 | ruleAppLabel | Optionally supply a default label used by the execution service to identify the ruleapp version to run. |
| 7 | crmConnectionString | Provide a Dynamics connection string of type OAuth to use a regular named account and type ClientSecret for S2S authentication. Information on connection string formatting can be found here: https://docs.microsoft.com/en-us/powerapps/developer/common-data-service/xrm-tooling/use-connection-strings-xrm-tooling-connect For OAuth authentication, you can use the default app provided by Microsoft instead of creating and configuring your own application. You can find more about this, as well as the transition from WS-Trust (Office 365) to OAuth authentication here: https://docs.microsoft.com/en-us/powerapps/developer/data-platform/authenticate-office365-deprecation If using a named account, it should have either the 'InRule Integration Administrator' role or a custom role and have read access to the entities used to run rules. It is important to note that the 'InRule Integration Administrator' role is not updated when new entities are created. Refer to Dataverse Connectivity and Authorization for more information. Important: Some customers have reported needing to provide a username in the format "domain\username" in order to successfully connect using IFD. |
| 8 | appServicePlanName (If you wish to override the default value) | This is an optional parameter, that if left blank, will result in the ARM Template creating an AppServicePlan for you, using your defined appServiceName and appending "Plan" to the end. For example, defining your appServiceName as "ExampleAppService" would yield the following automatically generated App Service Plan name: "ExampleAppServicePlan." This parameter is intended to be used if you wish to either have a new AppServicePlan be created using a different name than the one outlined above, or for defining the name of a pre-existing App Service Plan that you would like to create your resources under. In the latter case, additional steps are required. For a more comprehensive guide on how to deploy your resources under an existing AppServicePlan, refer to Azure App Service Plan Configuration |
| 9 | createOrUpdateAppServicePlan | By default, this value is set to true, and an App Service Plan will be created by the ARM template or updated if it already exists using the default naming convention. If you wish to deploy your app service to an already existing App Service Plan rather than create a new one, set this value to false and reference Azure App Service Plan and Application Insights Configuration. |
| 10 | inRuleVersion (To deploy the latest version, leave as default value) | This parameter allows the user to configure what version of the InRule Rule Execution Service they wish to deploy. By default, this parameter will be set to the most modern version. |
| 11 | appInsightsConnectionString | Provide a connection string if you want to use Azure Application Insights for logging and telemetry. For more information on the logging view Rule Execution Service Event Log and Azure App Service Plan and Application Insights Configuration. |
Once you've finished configuring your parameters, save the completed parameters file and keep a spare copy on hand for future upgrades or automation.
4: Option 1: Deploy ARM Template with Azure CLI
Now that the ARM template is configured, we'll deploy it to get the resources up and running. The following will detail how to use the Azure CLI to deploy the ARM template (Note, this section assumes Azure CLI has already been installed):
4.1 Run Command Prompt or PowerShell
4.2 Navigate to the RuleExecutionAzureService Folder
C:\>cd RuleExecutionAzureService

C:\RuleExecutionAzureService>
4.3 Enter "az login" to Login Into Azure
C:\RuleExecutionAzureService>az login
4.4 Enter Your Azure Admin Credentials to Login When Prompted in the New Browser Window Opened

4.5 Select the Appropriate Subscription
If your Azure account has access to multiple subscriptions, you will need to set your active subscription to where you create your Azure resources:
C:\RuleExecutionAzureService>az account set --subscription SUBSCRIPTION_NAME
4.6 Create Resource Group
If you have not created a resource group yet, you will need to create one. You will need to define a name and a geographic location for where to host the resource. This example uses Central US:
C:\RuleExecutionAzureService>az group create --name ResourceGroupName --location centralus
4.7 Execute the Following Command to Deploy the ARM Template
Replace "ResourceGroupName" with the name of the Azure Resource Group you want to deploy to
C:\RuleExecutionAzureService>az deployment group create -g ResourceGroupName --template-file .\azuredeploy.json --parameters .\azuredeploy.parameters.json --query properties.outputs.relayKey.value -o table
Observe that the template deploys with no errors
If the template deploys successfully, you will see a result that looks similar to this:

If the Azure Relay integration mode was selected, the value that is output is your Azure Relay key, which is a value you will need to configure your Dynamics instance in a later step.
5: Option 2: Deploy ARM Template with PowerShell
(If you have already deployed the ARM template via Azure CLI in the section above, this section is not necessary)
Now that the ARM template is configured, we'll deploy it to get the resources up and running. The following will detail how to use PowerShell to deploy the ARM template (Note, this section assumes Azure PowerShell has already been installed):
5.1 Run PowerShell
5.2 Navigate to the RuleExecutionAzureService Folder
PS C:\> cd .\RuleExecutionAzureService\
PS C:\RuleExecutionAzureService>
5.3 Enter "Connect-AzAccount" to Login Into Azure
PS C:\RuleExecutionAzureService> Connect-AzAccount
5.4 Enter Your Azure Admin Credentials to Login When Prompted in the New Browser Window Opened
5.5 Select the Appropriate Subscription
Upon logging in, your default subscription information will be displayed:

If this is not the subscription you want to deploy to, you can use the "Select-AzureRmSubscription" cmdlet to change the targeted subscription. Just replace "SubscriptionNameHere" with the name of the desired subscription:
PS C:\RuleExecutionAzureService> Select-AzSubscription -SubscriptionName SubscriptionNameHere
5.6 Create Resource Group
If you have not created a resource group yet, you will need to create one. You will need to define a name and a geographic location for where to host the resource. This example uses Central US:
PS C:\RuleExecutionAzureService> New-AzResourceGroup -Name ResourceGroupName -Location centralus
5.7 Execute the Following Command to Deploy the ARM Template
Replace "ResourceGroupName" with the name of the Azure Resource Group you want to deploy to
PS C:\RuleExecutionAzureService> New-AzResourceGroupDeployment -ResourceGroupName ResourceGroupName -TemplateFile .\azuredeploy.json -TemplateParameterFile .\azuredeploy.parameters.json
Observe that the template deploys with no errors
If the deployment is successful, you should see an output similar to this:
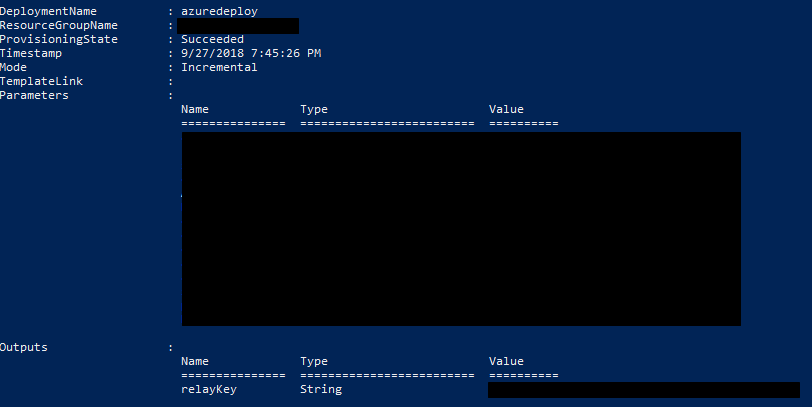
If the Azure Relay integration mode was selected, there will be a value of "relayKey" underneath the "Outputs" heading. This value is your Azure Relay key and will be needed when configuring your Dynamics instance in later steps.
6: Verify Setup
Navigate to the Azure portal and locate the deployed App Service

Click on the app service and verify that the status is 'Running'.
7: Upload License File
Regardless of how you choose to deploy the ARM template, you'll need to upload a license file to it for the rule execution app service to properly function. The simplest way to upload the license file is via the Azure App Service Editor. Alternatively, you can deploy the license file via FTP. A walkthrough of how to upload the license file by either of these methods can be found in License Management.