Executing Dynamics 365 Rules from Power Platform
Over the years Microsoft has extended the functionality available in Dynamics 365 by providing deep integration into other Microsoft products. Most of these products now fall under the 'Power Platform' umbrella, which includes things like Power Apps and Power Automate. These technologies are underpinned by the Dataverse and the Common Data Model, which is the same technology used to store and manage entities in Dynamics 365. These are some examples of things you can do with InRule and Power Platform:
- Power Automate – Use the Dataverse Connector to run rules against an entity as part of a flow, and use the rule output later in the flow
- Dataverse and Model-driven Apps – Create custom model-driven apps that execute rules using the Run Rules button and Plugin events, just like in Dynamics 365
- Canvas Apps – Using the integration with Power Automate, execute rules from forms with entities to display notifications or take other actions based on rule output
- Power App portal – Run rules and display rule output in customer-facing portals (requires custom code for UI and triggering custom action; contact InRule for more information)
In the following sections, we will describe in more detail how to use InRule from both Power Automate flows and Canvas apps.
Power Automate
Power Automate is Microsoft's low-code solution for building workflows and business logic. The primary way Power Automate flows can interact with Dynamics is through the Dataverse Connector. This connector lets you interact with entities, as well as other Dataverse-specific functionality, like invoking a custom action. Using the custom action step, you can call the InRule RulesEngineAction included with the InRule solution, and pass in all the required information to execute rules against an entity. This will kick off the same plugin logic that is used by the Run Rules button and entity events within Dynamics and return the same set of information. If the rules you've written handle making all of the changes you need, you can simply fire the RulesEngineAction and move on, or you can use the rule output later in the flow for downstream processing. You could, for example, write the notifications returned from rule execution to an email and send that to a user. The steps below will show you how to set up a flow to execute rules on an entity.
-
Once you've installed InRule for Dynamics 365, go to https://flow.microsoft.com, and make sure you've selected the Dynamics or Dataverse environment containing the InRule solution

-
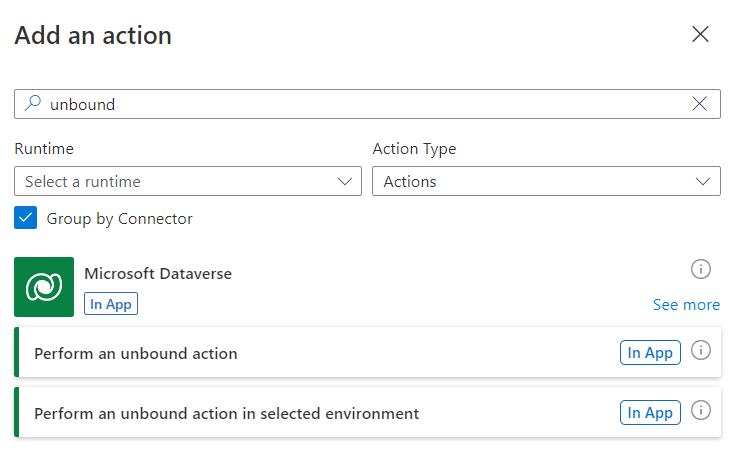
Create a new flow using whichever trigger is appropriate for your flow, and then add a new Perform an unbound action in selected environment action.
-
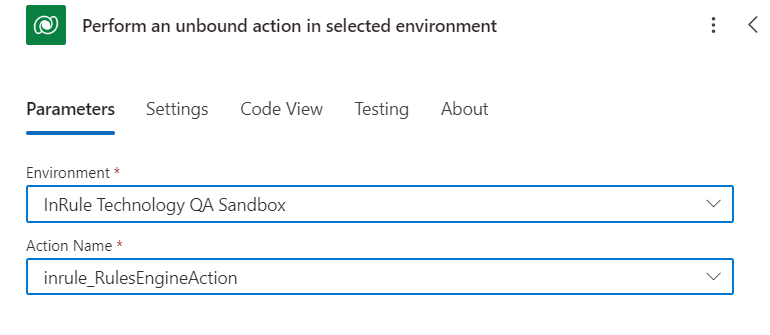
Select the current environment from the environment drop-down. Next, search for the 'inrule_RulesEngineAction' action in the list of available actions.
-
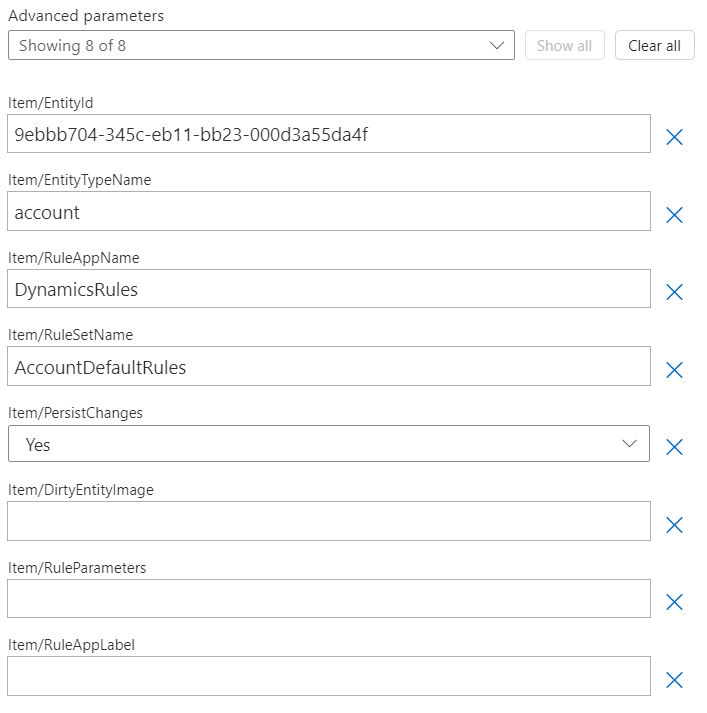
Once you select the action, the step should automatically create the required fields for the RulesEngineAction. To view the fields, hit the Show all button next to the Advanced Parameters drop-down. Most of these values will typically be static, but the entity ID will need to be provided as an input to the flow, or read from an entity object used in the flow
-
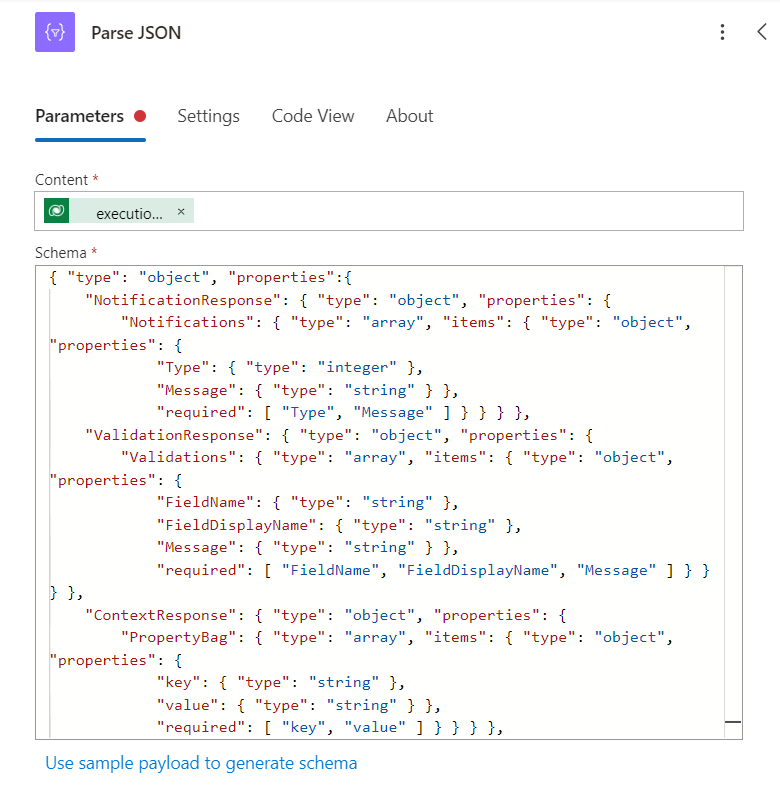
If you want to use the output of the rule execution in your flow, you will likely need to parse the JSON result to access the individual components of the response. In most cases, this should not be necessary because changes are automatically saved back to Dynamics. To do this, add the Parse JSON step, and select the 'executionResult' content from the unbound action step. In the 'schema' field, copy and paste the JSON schema from the Custom Action section.
-
Working with nested objects can be difficult in Power Automate, so if desired you can add an additional step to help break out the values you want. If, for example, you want to use notifications and errors, you can parse the initial response as usual in the first step, and then have additional parse JSON steps to parse out notifications and errors.
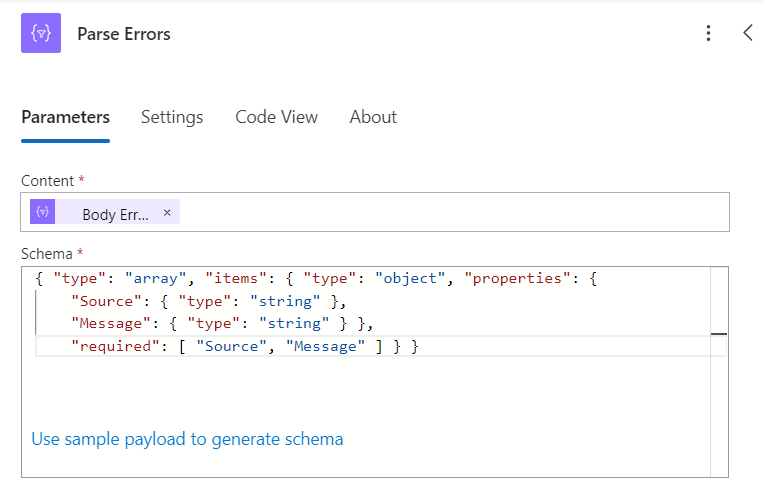
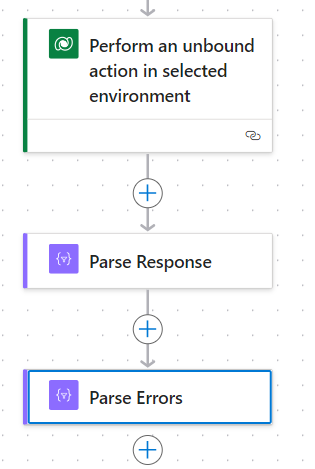
If you follow this method, you can select the following properties from the output of the initial step, then use the provided JSON schemas to parse just that property:
-
Notifications
{ "type": "array", "items": { "type": "object", "properties": {
      "Type": { "type": "integer" },
      "Message": { "type": "string" } },
"required": [ "Type", "Message" ] } } -
Errors
{ "type": "array", "items": { "type": "object", "properties": {
      "Source": { "type": "string" },
      "Message": { "type": "string" } },
"required": [ "Source", "Message" ] } } -
Validations
{ "type": "array", "items": { "type": "object", "properties": {
      "FieldName": { "type": "string" },
      "FieldDisplayName": { "type": "string" },
      "Message": { "type": "string" } },
"required": [ "FieldName", "FieldDisplayName", "Message" ] } } -
PropertyBag
{ "type": "array", "items": { "type": "object", "properties": {
      "key": { "type": "string" },
      "value": { "type": "string" } },
      "required": [ "key", "value" ] } }
-
-
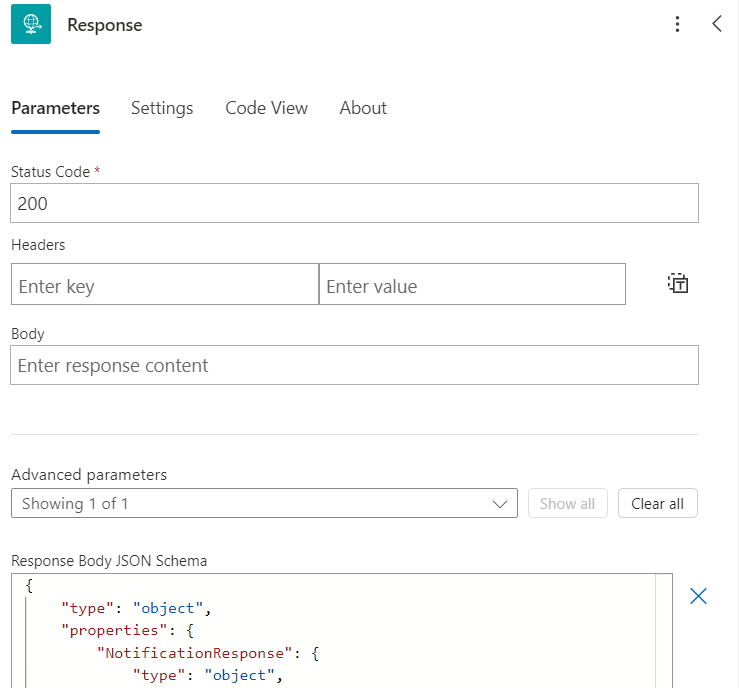
If you need to return results from this flow to, for example, a canvas app, you can either build your own response object, or you can feed the execution result directly into the Response step, using the same content and schema as above
Canvas Apps
While model-driven apps like Dynamics 365 are useful in many scenarios, canvas apps provide more flexibility in design. While canvas apps do not necessarily have to use Dataverse entities, if your app uses entity forms or integrates with entities in some other kind of way, you can utilize the integration with Power Automate to run rules against these entities and display information from rule output directly in your app. We will provide some boilerplate code here for potential use in a canvas app, but given the flexibility of canvas apps, your code may look very different. The following directions will show you how to add a Run Rules button to a page with an entity form and use the output from rule execution to display notifications to the user.
-
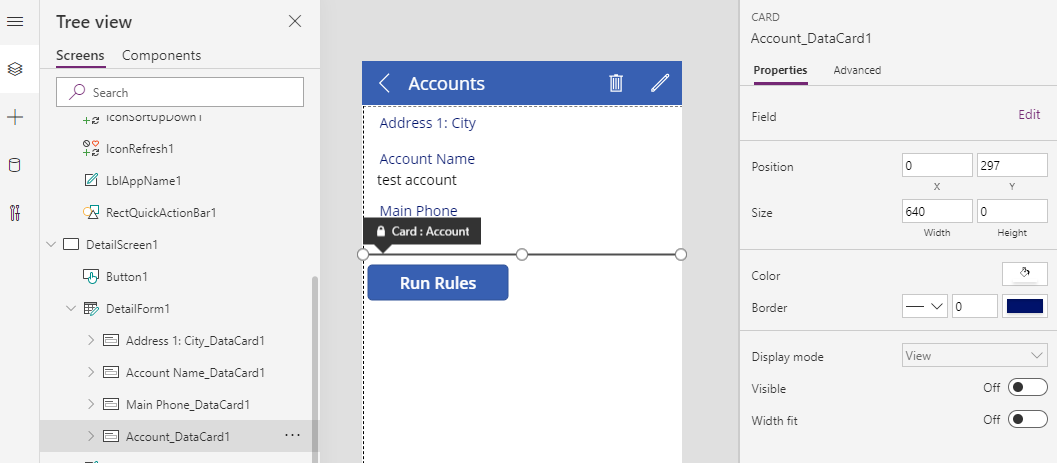
The starting point for these steps is a canvas app that already has a screen with an entity form on it. In order to run rules against the particular entity the user is viewing, you will need to add the ID field for the entity to the form, but you can set the visibility to 'Off' so it won't show on the page
-
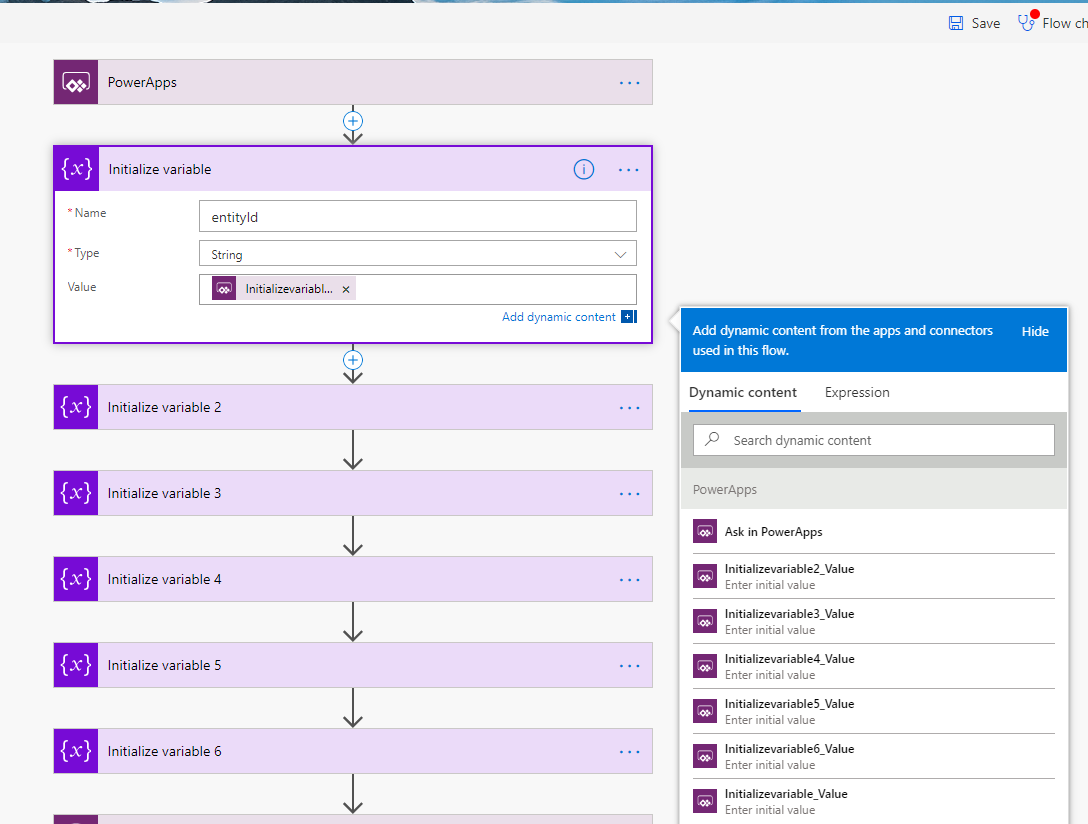
Next, we'll need to create a flow that will invoke the included RulesEngineAction and run the rules. For more information on how to set up a basic flow to run rules, refer to the previous section on Power Automate. When creating this flow, you will need to use the Power Apps trigger. This will make the flow available for selection and allow for input from the canvas app. To get input from the canvas app, click in a content field and choose Ask in Power Apps from the Power Apps trigger. This will automatically create a new content variable that you can reference in the flow and make that variable available as input to the flow. You can add as many of these variables as you want, but you will need to add at least one variable for the entity ID. Other values required by the RulesEngineAction, such as rule app or rule set name, can either be hard coded into the flow, or passed in via variables
-
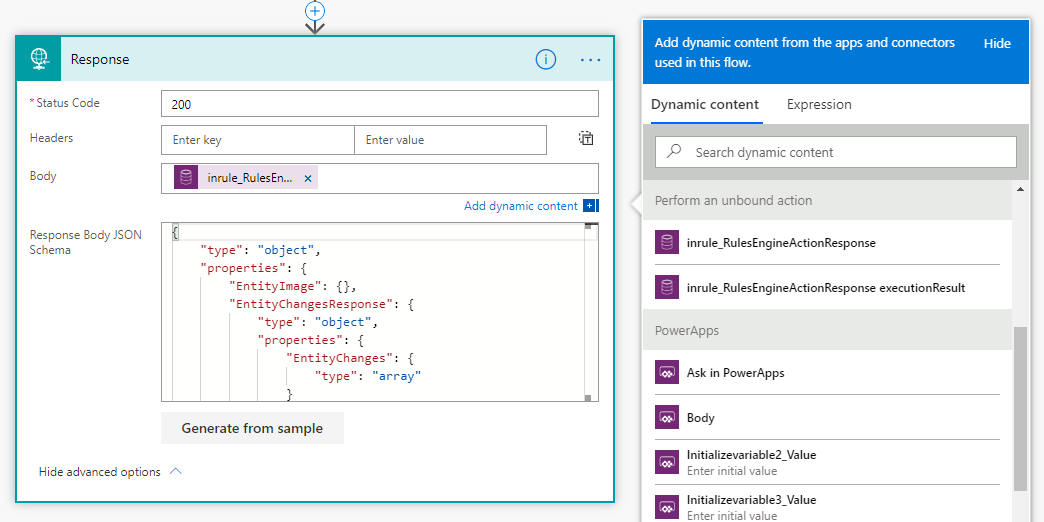
If you want to use the execution result in your canvas app, you'll need to add a Response step to the end of the flow. The 'executionResult' will need to be returned in the body, and the JSON schema from the Custom Action section will need to be provided in the 'JSON Schema' section under 'Advanced Options'
-
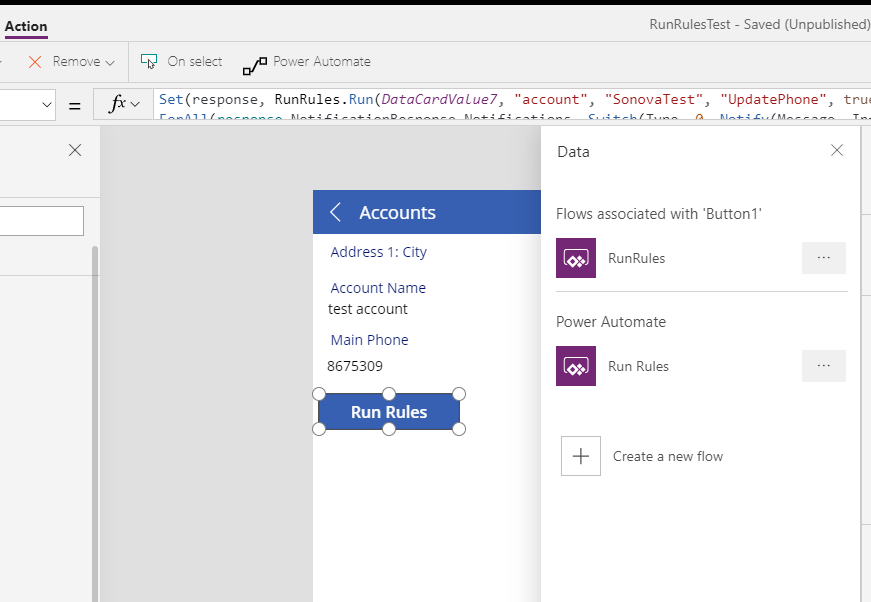
Next, you'll need to add a button and link it to Power Automate flow we just created. To do this, add a new button to the screen and go to the Action tab for the button. Choose Power Automate and you should see the flow you created in the previous step listed here. If you do not see the flow, make sure you canvas app and flow are in the same environment. Select your flow to associate it to the button
-
You can use the following function snippet as a starting point for the function for your button. This snippet calls the associated flow (in this case called 'RunRules') and sets the output to a variable. It then loops over all of the notifications in the response, displays them to the user, and refreshes the form data. Due to limitations in the way notifications work in canvas apps, only the most recent notification is shown, but you can expand on the sample with your own custom code. In this example, all of the properties required for the RulesEngineAction are passed in to the flow, but you may choose to set these in the flow itself. The only value that must be passed in is the entity ID, which is the first parameter here. When editing this code in the function editor, the intellisense will display which parameter maps to which variable in the flow.
Set(response, RunRules.Run(AccountIdValue, "account", "DynamicsRules", "UpdatePhone", true));

ForAll(response.NotificationResponse.Notifications,
Switch(Type,
0, Notify(Message, NotificationType.Information),
1, Notify(Message, NotificationType.Warning),
2, Notify(Message, NotificationType.Error)));

Refresh(Accounts);
-
Once the setup is complete, you can test the rule execution by previewing the app and hitting the Run Rules button. If execution is successful, you should see any notifications from rule execution displayed in the app